Thursday 27 November 2014

Quilty Stitches blocks 9 - 12

Today I bring you another 4 of my "Quilty Stitches" blocks by Little Miss Shabby

Don't forget that you can click on the links below to access the patterns for each block from her website. Blocks 1-4 Blocks 5-8

Block 9 - the "Pinwheel" block


Block 10 - the "Playful Petals" block


Block 11 - the "Japanese X" block


Block 12 - the "Economy" block


And here is a progress shot of where I am up to so far.  Don't forget to tag me in your photos on Instagram @BendigoLioness as I would love to see your photos!

Tuesday 25 November 2014

Mini "Norway" for Sharon

 
What do you give a quilting friend who loves Bonnie & Camille?  A Thimble Blossoms mini quilt made out of Bonnie & Camille fabric of course!  Last week I visitted my dear friend Sharon @lilabellelane and I surprised her with this little mini.
  
"Norway" mini by Thimble Blossoms made out of "Miss Kate" fabric
 
"Norway" mini by Thimble Blossoms made out of "Miss Kate" fabric


Whilst at her house I was able to view her Bonnie & Camille fabric collection - apart from all her yardage (not pictured), she has a jelly roll and layer cake in each fabric range.
 
Bonnie & Camille jelly rolls - she has one of every collection!

Her Bonnie & Camille folded layer cakes - also one of each collection.
 
I was also fortunate to view her La Passacaglia project in person although this photo just doesn't do it justice.  It has all been hand pieced by her (English Paper Piecing) and is made out of Tula Pink fabrics. 
 
 
Still a work in progress, Sharon's "La Passacaglia"

a close up of her double headed Tasmanian squirrels ;)

a close up of her racoons
 
 If you would like to see more photos of this masterpiece, type #lilabellelanelapassacaglia into your Instagram search.  Her work will just blow you away!

Thursday 20 November 2014

Quilty Stitches Blocks 5 - 8

Today I bring you another completed row of Little Miss Shabby's "Quilty Stitches" blocks. 

Just a reminder that you can download the patterns from her website by clicking on the links below if you would like to sew along with meBlocks 1-4 can be accessed here.

Block 5 - Lori Holt's "Barn" block

Block 5

Block 6 - the "Friendship Star" block

Block 6

Block 7 - the "Lone Star of Paradise" block

Block 7

Block 8 - the "Granny Square" block

Block 8

So now we are at the half way mark. 
 
Are you sewing along with me?  I'd love to see how you are going.  Please tag me on Instagram @BendigoLioness so that I can see your photo/s
 
Here is how mine is currently looking:

My half way progress shot

Wednesday 19 November 2014

Schnitzel & Boo Mini Quilt Swap


I've joined the Schnitzel & Boo Mini Quilt Swap on Instagram.  If you are my gorgeous & wonderful stalker - here is a link to the inspiration folder that I have created for you on Pinterest.


Monday 17 November 2014

Mystery Quilt "Millefiori" with Sarah Fielke

My latest quilt top finish is the Millefiori Mystery Quilt by Sarah Fielke

This quilt pattern was released over a 12-weeks period via the Spotlight Facebook page & the Spotlight website.  Each week you could download a free PDF file containing instructions on how to make that week's block/s.  As this quilt was a mystery, the picture of the finished quilt was not released until the end.  I waited until it was all released before I purchased the fabric and eventually started to make it only a few weeks ago.  I have included links to the pattern at the bottom of this article if you wish to download them.
 
Millefiori Mystery Quilt - design by Sarah Fielke
The quilt finishes at 80", which is about 2m square, so it is suitable for a large single bed, a double bed, or a large throw. There is an option to add an 8" border to the quilt to turn it into a queen size, however I haven't decided if I will enlarge it yet.
 
This quilt contains applique.  I chose to do hand needle turn applique instead of machine applique or fusible hand applique.

Personally I prefer hand needle turned applique.
My thread of choice is Superior Threads "Bottom Line" 60wt polyester thread.  I have 2 neutrals on reels (colours 619 & 623) and I recently purchased a "Super Bobs Donut" which holds 118 yards of each of the 35 colours.
A close up of the centre panels with the smaller circles.  All of these were appliqued by hand.
 
The fabrics used in this quilt are from Sarah Fielke's "Millefiori" fabric range which was released in October 2013.  Within Australia and New Zealand, these fabrics are exclusively sold through Spotlight stores.  If you live outside of Australia the fabric (if still available) can be purchased directly from Sarah Fielke via her website.
 
The Fabric Range

 
Here are the links to each week's pattern instructions:
 
 
I thoroughly enjoyed making this quilt top!  Now I just have to design a back for it and hand quilt it.  My goal is to have this quilt completed by Australian Winter 2015.


This made my day; when I posted a photograph of the finished top on Instagram, Sarah Fielke "liked" my photo! ☺️  Talk about making my head swell!

Friday 14 November 2014

Quilty Stitches Blocks 1 - 4

I don't know about you, but I always tend to have a hand sewing project on the go for those days when I am confined to the couch.  Lately I started Little Miss Shabby's "Quilty Stitches". Although the official sew-a-long has now ended, the patterns are still available for download via Little Miss Shabby's website (links below).
 

Little Miss Shabby's "Quilty Stitches"Sampler Along.
This little cross stitch sampler features some popular quilt blocks - with each "block" measuring 1 3/4".  There are a total of 16 blocks.  All of the instructions of what equipment you will need can be found here.  I have decided to make my version in my own unique colour scheme which a friend described as being "wild & whacky, just like you Fiona".

I will endeavour to publish my updates in groups of 4 and will include a link to each block pattern in case you wish to join along with me.

Block 1 - the "Swoon" block

Block 1

Block 2 - the "Odd Fellows Chain" block 

Block 2

Block 3 - the "Rolling Stone" block

Block 3

Block 4 - the "Flying Geese" block

Block 4
As you can see I have decided to do little black and white checker box corner stones between each block.  Sarah Fielke once told me that when you are dealing with a lot of bright colours you need to use black and white neutrals to tone it down and to balance the eye.  I have also used a slightly lighter shade of teal to fill the background of my blocks.
 
Well I am finding that it is taking me approximately a week of "stitching during evening TV time" to complete 4 blocks - I have already stitched the border grid but you can always add this in at the end.  Would you like to join me?  Please tag me on Instagram @BendigoLioness so that I can see your photos.

Tuesday 11 November 2014

Mum's New Shoulder Bag

I recently had my Mum over for a lesson in how to fussy cut fabric.  She was about to make a new handbag using the "Under The Australian Sun" range of fabrics.  Instead of randomly cutting into this pretty fabric, I wanted her to make a feature out of some of the flowers.  After posting the original photos of her visit on Instagram, many people asked me to post photos of her finished handbag.  Here you go ladies - you know who you are :0)
 
Working out which part of the pattern to feature, in the background Mum holds up her original bag.

Fussing cutting commences...
Originally Mum saw a handbag displayed in a shop window in Strathfieldsaye and she immediately liked it.  Knowing who the person was who had made it; my Mum asked her for a copy of the pattern, which she then adjusted to suit her own needs.  I'm not allowed to tell you who's pattern it is and no she will not sell it either. I did ask.  Sorry ladies.
 
Mum's first bag was a winter edition made using suede and cotton.  You can fit a lot inside.


Her latest version is a summer bag made with "Under The Australian Sun" fabrics. 

My Mum thinks she is a dentist so I cannot show you her face.  LOL  #InJoke
My headless mother models her new handbag.  She has made this one slightly larger.

 
Her new bag has lots of hidden inner compartments to hide her secret things in and there is a side pocket on the front of the bag.

Saturday 8 November 2014

Tilda Jewels

My latest quilt finish has been a long time in the making and has also been a huge learning curve for me.
In October last year (2013 - when I was still VERY new to quilting), the latest Tilda range of fabrics was released - Tilda Fruit Garden & Tilda Summer Blues.  As soon as I saw them I just fell head over heals in love.  I had no idea what I was going to do with them, but I knew that I had to buy them for Mum as the colours would go perfectly in her bedroom!
 

Tilda's 2013 Fruit Garden & Summer Blues fabric range: L-R "Spots" in teal; "Babette" in teal; "Betsy" in green. Middle row: "Berrie" in pink & teal. Bottom row: "Ruby" in pink, blue and green.  The fabric lying across the very top is a sample of Mum's curtain fabric.

I had recently been given some old quilting magazines from my dear friend Carlie, so I flipped through them looking for patterns that I felt that a) I could handle and b) that I had sufficient yardage to make with this range.  I marked the selected patterns and handed the short list to Mum to choose a design.  The quilt that she chose was from Australian Patchwork & Quilting Vol. 5 No. 2 and is called "Jewel Box Variation Quilt" by Bev Darby.  As stated in the magazine; "While it looks intricate, this quilt is simple to make, with quick cutting and piecing techniques."  I thought this should be within my then capabilities.  

My first lesson was in Quilt Maths.  This pattern is for a quilt measuring 186cm x 267cm (73 1/4in x 105 1/4in), but Mum didn't want it as large as this - she only wanted it big enough to lie across their queen sized bed but to sit just below their pillows.  I decided rather than resizing the blocks, I would instead take out 3 rows and then the pattern would still appear balanced and would be adequate for Mum's requested sizing.

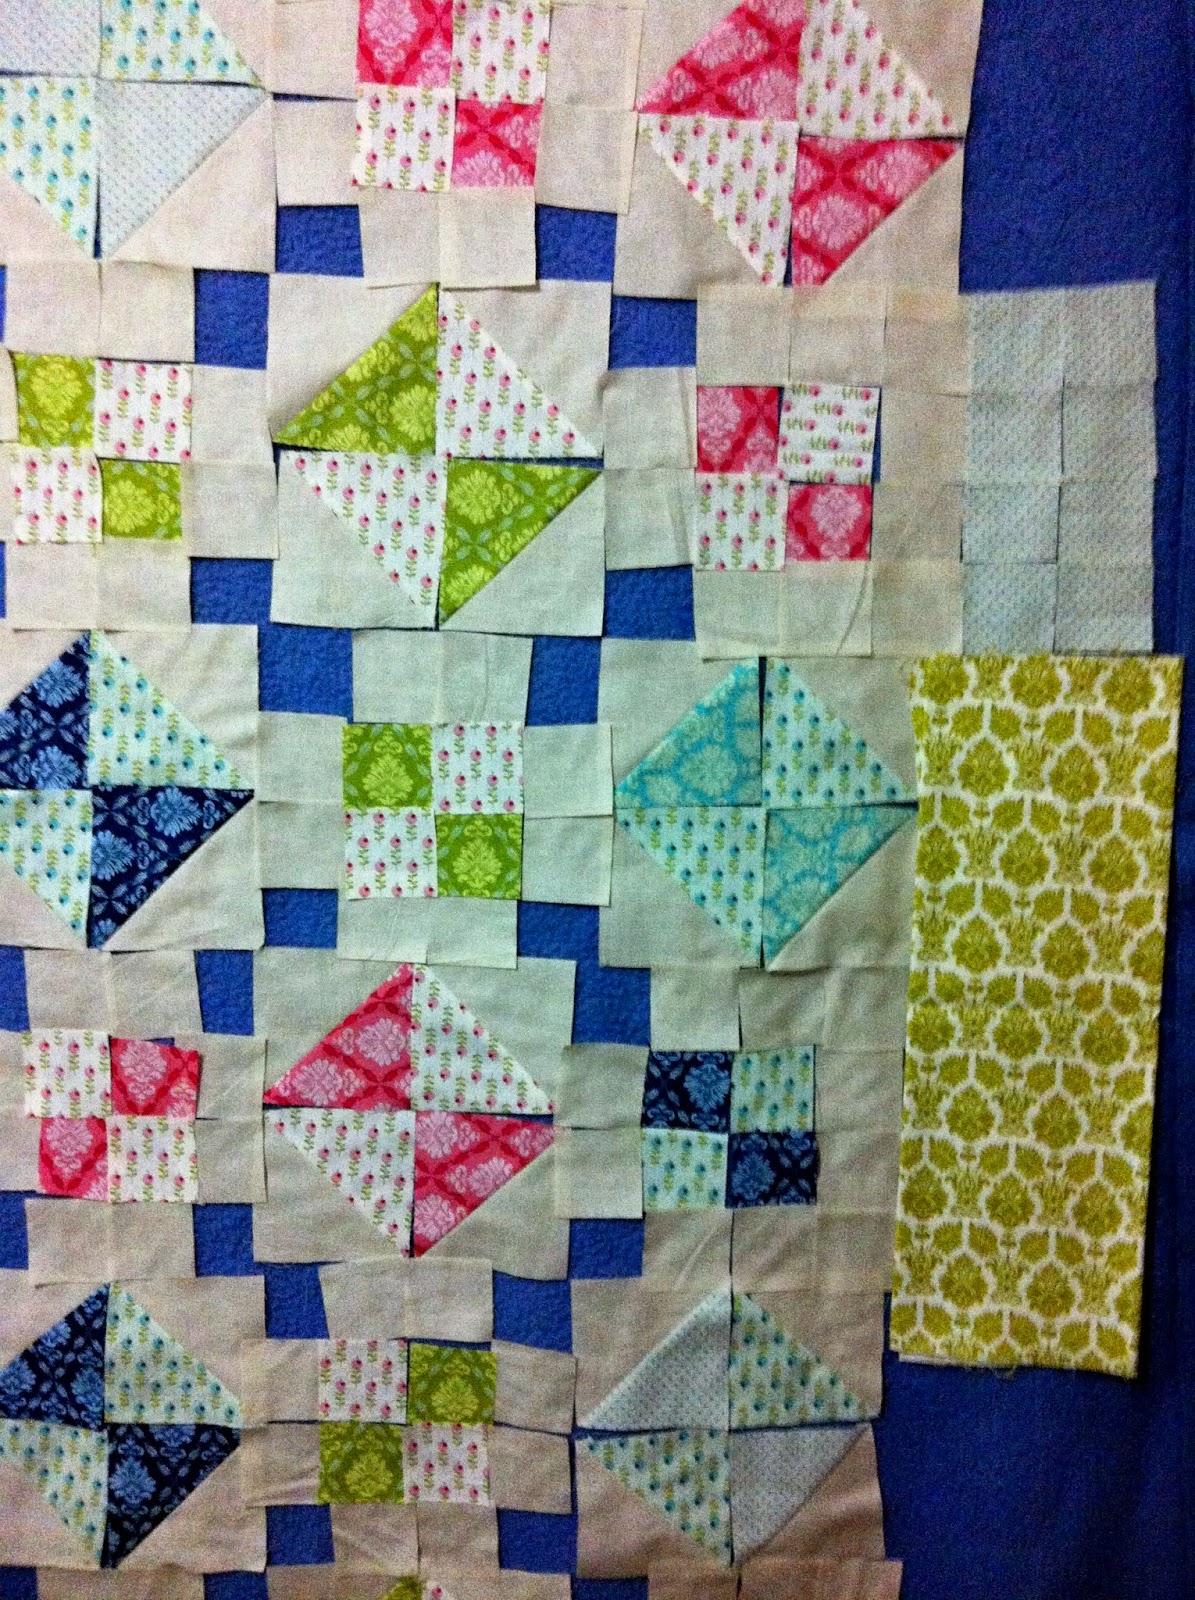
I learnt how important it is to audition fabric and placement of pieces on a design wall.  As I did not have a design wall, I initially hung an old blue woollen blanket on the wall in the spare bedroom.  I really wish back then that I understood what a "low volume fabric" was and how to (and not to) use them.  I think this quilt is a real failure in that department.  Standing up close, the fabrics look really pretty together and I can understand looking back why I placed them where I did - however from a distance these fabrics "blend" into the background and the full effect of the pattern is lost. 


My completed quilt top hung up on my original design wall.
I also learnt how different colours can look in different environments.  For example, on my blue design wall at home the colours in this quilt looked drab.  However when I placed the top on Mum & Dad's bed the colours came to life.  The greens took on a gold tone and the sand coloured homespun appeared brighter, whiter and creamier.  The pinks and blues took on a personality of their own and they highlighted the pops of colour of the accessories throughout the bedroom.
Laid out in Mum & Dad's bedroom - the colours all come alive.
I started to make this quilt in late December last year (our summer - and summers in Bendigo are unbearably hot).  Whilst my landlord was undertaking renovations to my back yard, I was inside sewing like a mad woman.  I had this crazed idea that I would have the whole quilt completed by the end of that year.  Boy was I naïve! It didn't take me very long to sew the top together, but attempting to machine quilt a near-queen size quilt on my old Elna in 40C+ summer temperatures - yeah right.  At this stage of my quilting journey I had never attempted to machine quilt anything before so I didn't really understand what was involved, and nor did I have a walking foot for the sewing machine.

Thus this top sat neatly folded up in a bag and neglected for many months.  Over time Mum chose and purchased the backing fabric and batting.  I slowly fumbled my way through learning how to quilt a quilt, Mum even paid for me to attend a "Free Motion Quilting" class at my local quilt shop. However, I soon came to realise that with the limitations of my health, this quilt would be too large for me to handle.  Eventually the decision was made to have this one finished off by a professional quilter.

I had never had a quilt professionally quilted before and some of the quilters I approached made me feel intimidated either by their attitude or their prices.  After hearing of my woes, a friend referred me to her friend and local long arm quilter - Linda Cotton of Ladybug Quilting (Linda's contact details are further below).  As soon as we met her, Mum and I felt immediately at ease. Linda showed us many examples of her work and patiently discussed our many options.  

Another lesson I learnt was when purchasing fabric or batting - even if you are not using it for a while - always double check the length of your purchase as soon as you get home.  From memory the batting was purchased back in April and we were unaware that the girl had cut it shorter than we had requested (and paid for).  As it had sat unchecked for more than 6-months in the bag, we could not rectify this with the shop that we purchased it from.  A disappointing and expensive lesson learnt, but hopefully I can use this batting for another project.  We only realised the problem when Linda went to load it onto her quilting frame.  Thankfully Linda has a good quality cotton batting available for purchase so we ended up using hers.  In the end it was cheaper to purchase and of a better quality!

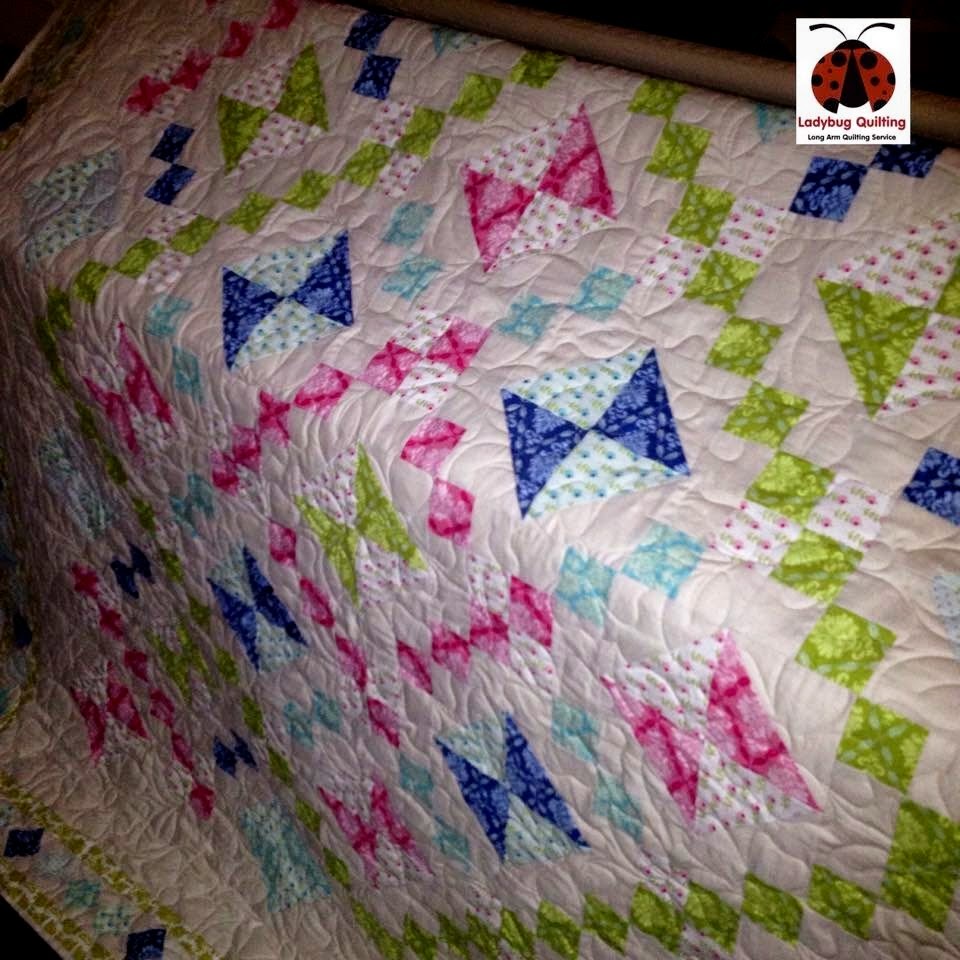
Here are some close up photographs of Linda's quilting: 

Quilted by Ladybug Quilting using "Lively" by Lorien Quilting for the E2E pattern


As you can see, Linda has done an AMAZING job quilting this quilt.  I will definitely be using her services again! Here are her contact details:

  Ladybug Quilting
Long Arm Quilting Service

Linda Cotton
Kangaroo Flat, Bendigo