Showing posts with label sewing. Show all posts

Thursday, 29 October 2015

Craft It Forward


Late last year I read a blog post by my friend Nessa at Nessa's Place who was participating in a sewing themed Pay It Forward idea.  As I was one of the first three to leave a qualifying comment on her blog post, I would receive a handmade gift in the post from her over the next twelve months.


I have to admit, when the parcel arrived back in May, I instantly went into panic mode when I saw the words "Craft it Forward Swap" fearing that I had stuffed up and forgotten to send off a swap parcel. Then I read it properly and started to breath again as I remembered about the Craft it Forward post I had seen ages ago on her blog and I realised what it was.  DUH!!!

The items I received from Nessa
Nessa had made a pincushion with hanging pockets and a loop to hold onto a bucket for collecting threads and trimmings.  The pin cushion is weighted down with rice and has a felt strip down the middle for sewing needles. It is attached to a hanging pocket that can sit next to your sewing machine or on your armchair.  There is a loop to attach the threads bucket, but if you aren't using it then the loop tucks in to one of the pockets.  

Also included with the main gift was some Scottish Tablet (Nessa lives in Scotland) and some rich treacle toffees.  She also generously included some Liberty of London fabric scraps.

A close up of the pin cushion & scrap bucket
I cannot thank Nessa enough!  I absolutely love it!! I use it all the time and it sits comfortably on the edge of my sofa or "soffice" as I like to call it.

I absolutely LOVE my gift. It sits next to my chair and already has a lot of scraps in the bin (I must remember to empty it). It really is fabulous & the colours are just perfect for my lounge & sewing room. I cannot thank you enough! I'm yet to post my Craft it forward on my blog but it will be coming!!!

If you would like to participate in Craft-It-Forward, you need to have your own blog and be one of the first three people to comment on this blog post.  You will need to be sure that I have your email address, so that I can contact you for your postal address and to ask you your favourite colours.  Then I will send you a handmade gift at some time before 31 May 2016!  (I am putting my deadline down for May as I did actually receive this from Nessa in May this year which makes it within 12-months of receiving my item).  This is open worldwide. When you receive your gift you need to be prepared to host your own Craft-It-Forward on your blog, and then send out a homemade gifts to three different people within 12 months of receiving your item.

I am looking forward to getting to know three of you better,  and to work out a perfect little crafty gift for you!

Thursday, 1 October 2015

Junior Hexies Down Under


Are you under 15 and have been watching the letterbox just waiting for some mail but it is always hexagons!!! Ever think, I could do that if only mum or dad would give me a tiny bit of help??  Well here is your chance, #hexiedownunder introduces #juniorhexiesdownunder, the swap just for under 15s. 
 
This is a simple swap and all children will be sewing three hexagons together in a triangle formation.  Parents can help to baste the hexies and to support their child to sew the hexies together but the children need to do most of the work, this is to encourage the child to sew and take ownership of their swap items. There is no need for a centre but one of the hexagons will need to have space for the name of the child who has sewn it.  

Hexies can be glue or thread basted depending on child and parent preference.  

Children will be sorted into groups according to age and will have 5 children in their group including themselves.  This means that they will make 12 hexagons made into 4 triangles, and they will also make one for themselves (meaning that in the end they end up with 15 hexies, sewn into five triangles).  All children must include a postcard of the town they are from and a quick message – written by them or their parent (let’s make this fun for children and bring back the joy of snail mail and pen pals!!)

This is an example of a hexie triangle
REQUIREMENTS:
  • This swap is open to Australian children under the age of 15 with an Australian postal address only. Sorry, no international members.
  • Mum or Dad MUST have a public Instagram account.
  • Members are required to create and mail one hexie triangle to each child on their list. 
  • Children can be helped to baste their hexies but they should sew the hexies together on their own for the most part – this is to encourage children to sew and take ownership of their swap items. 
  • Members are to use a good quality quilting cotton. Please do not use any other type/s of fabrics 
  • You are required to write the child's name and where they are from on one of the hexies with a permanent fabric marker.  
  • Please leave the papers/cardboard in so that the recipient can join them together easily. 
  • Post a photograph of your finished hexie triangles on Instagram tagging the recipient's parent together with the hashtag #JuniorHexiesDownUnder prior to mailing them off.
  • All children MUST include a postcard of the town they are from and a quick message - written by them or their parent.
  • YOU ARE ***NOT*** REQUIRED TO SEND ANY OTHER EXTRAS!!! Yes you read that correctly, you are not required to send anything other than the hexie triangle & a postcard per person to the members on your list.  If you use a C5 sized envelope (162 x 229 mm) it will only cost $1.40 to post within Australia.
Once the sign up data has been collated, you will be emailed a spreadsheet containing the details of the other children in your child's group.  You can work through this list at your own pace and mail them off as you go, however, we do request that you complete your list before 31 December 2015.   


Please direct any enquiries to:

Disclaimer: 
Junior Hexies Down Under is completely the brain child of Mhairi Alcorn.  
Please direct all enquiries to Mhairi, as I am just her I.T. Department ;0)


Tuesday, 23 December 2014

December Bee Blocks

Well December has finally rolled around and 2 out of 3 of my monthly Quilting Bees have now come to an end.  The Quilt Club Australia Stars Bee for 2014 has now ended, and I have a month off before the 2015 round kicks off in February.  I have resigned from the Quilt Club Australia's Hive #5 so this is my last bee block for that group.  Our Quilty Sisters Instabee continues with 2 new members joining us in January.  I will set up new page tabs for the 2015 quilting bees...

Meanwhile, here are the three bee blocks that I have made for December 2014:

Quilt Club Australia - Stars Bee (paper piecing)

This month is Alissa's queenly reign. Her chosen colours are Lime green & Grey on a solid white background.  I chose to make the Ohio Star for her:


Quilt Club Australia Hive #5
 
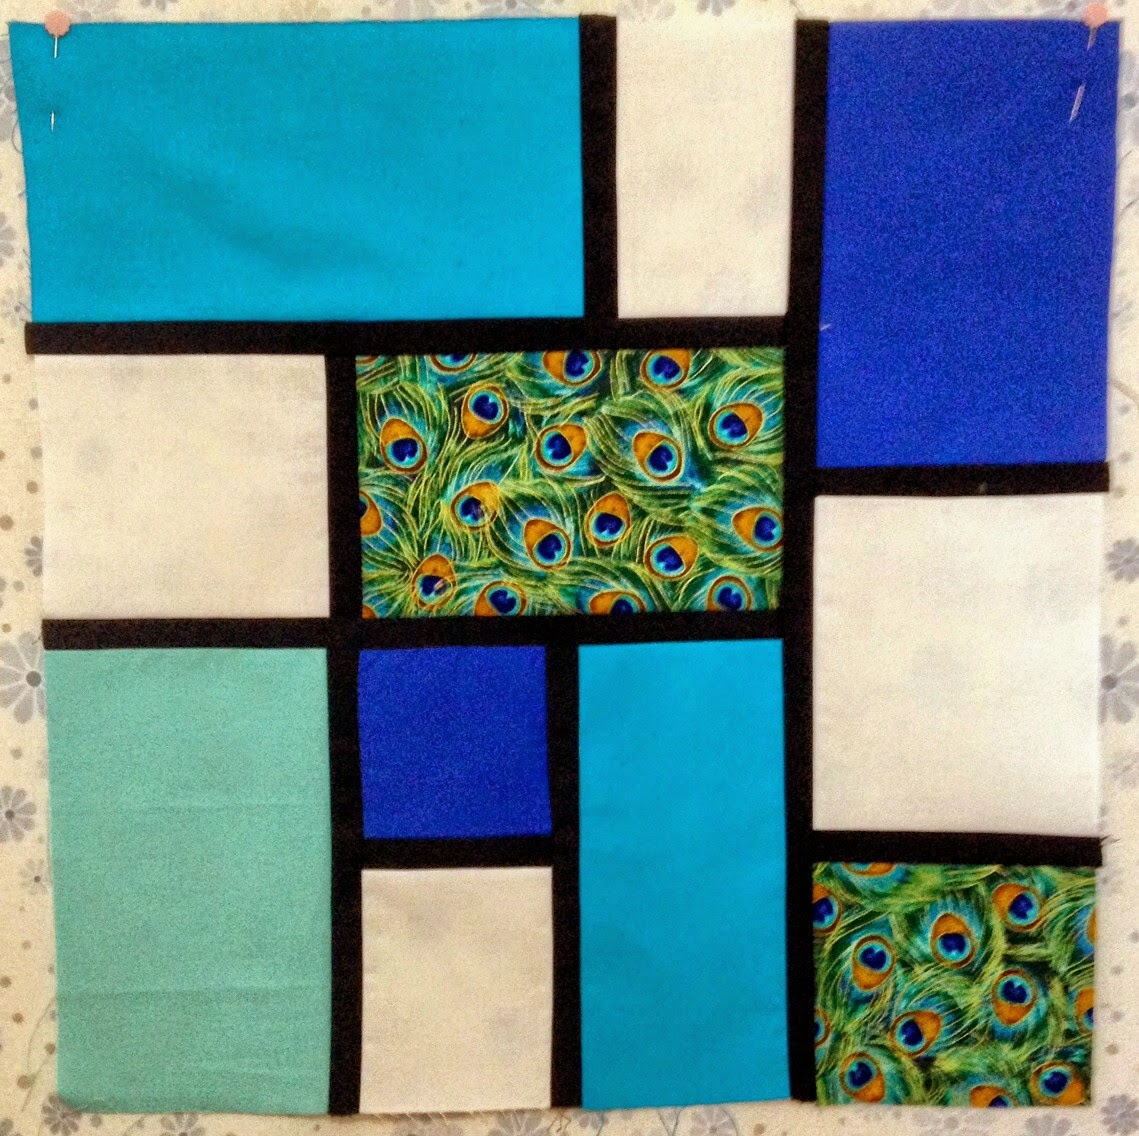
This month is Judy's queenly reign. Judy loved the Mondrian blocks that we made back in May so she asked us to make her a 16" Mondrian Block with blue & turquoise and a sparkly print to coordinate with a fabric range that she loves called "Tree of Life" by Chong A Hwang for Timeless Treasures.
 
This is Judy's inspiration print - "Tree of Life"

The block I made features a lovely peacock feather print.


Quilty Sisters Instabee
This month I made Carolyn's block which is the Come Together Block. Carolyn sent out the grey, teal & white fabrics and asked us to use whatever we wanted for the inner squares.  I used my Dashwood Annali fabrics.


Sunday, 5 October 2014

Spotlight Quilting Expo 2014

 
"Spotlight’s Quilting Expo is this Saturday the 4th of October 2014 from 11am – 3pm. Don’t miss out on FREE demonstrations, VIP exclusive discounts, new quilting fabrics and the chance to win a sewing machine, conditions apply! Ask your store for more information."
 
On Saturday 4 October 2014 I went along to the Spotlight Quilting Expo at my local store in Bendigo.  To celebrate, Spotlight was offering 30% off all fabric (excluding pre cuts & clearance items), exclusive VIP discounts, 25% off wadding, free demos and launching some new quilting ranges in store. 
 
Anyone who spent $25 or more on quilting fabric on the day would receive a copy of "Project Patchwork 3" for free. 
 
They were also encouraging people to bring along their quilts to be displayed.  One lucky person (per store) who submitted a quilt would win an Elna "Elina 21" Sewing Machine (worth $199).  All eligible quilts had to be made of 100% Spotlight fabrics
 
The local store manager had asked me on Wednesday to make something for the expo.  None of my quilts are exclusively made of Spotlight fabrics as I tend to mix & match & purchase fabric from many suppliers.  The only full size quilt that I had made exclusively with Spotlight fabrics ("Autumn Hearts") was now living with my BFF Miriam down in Melbourne.  I did have a mini quilt which was 97.9% Spotlight fabrics (the backing & a small slither on the front was not Spotlight fabric) so I brought it along to be displayed although it wasn't eligible to be entered into the competition.  I did however quickly whip up another mini for the day - "Elephantasy - the elephant of stolen dreams".


Millie is holding up my "Elephantasy - the elephant of stolen dreams" mini quilt.

My "Butterfly Fantasy" quilt

Millie is demonstrating how to make a patchwork cushion using the new Star Wars fabric.  She had already made one with Hello Kitty fabric.

Millie's daughter learns how to sew with Hello Kitty flannelette.

One of the special guests from "Strath Quilters" demonstrates hand piecing.

The ladies from "Strath Quilters".

Demonstration on how to make a small sewing caddy by "Strath Quilters".

Shirley is making some quilt blocks.

The lovely Shirley.

One of the quilts on display.

More quilts on display hanging above the fabric.

More quilts on display - I'm rather fond of those two on the left ;)

Hard to see the detail in this quilt but it is camels walking along the beach at sunset - it reminded me of Cable Beach in Broome.  Not sure who made it.

A beautiful Bargello quilt on display.  This one is mounted on canvas & is not quilted.

Some more quilts on display.

More quilts on display.

The winner of the Elina Sewing machine was a lady named Rosemary who had entered a large appliqued Christmas quilt.

The winning quilt - I didn't get a very good view of it.

The winning quilt - Christmas theme with lots of applique.
I felt rude that I didn't take a better photo but as one of Jehovah's Witnesses I do not celebrate Christmas. I respect the amount of hard work that went into making this quilt though and despite the subject of the quilt, I felt that Rosemary clearly deserved the win.  As I hadn't really looked at the Christmas entries, I thought that the bright Bargello might have won as it was truly stunning!


Friday, 26 September 2014

The Hoot has a home!

I received word that the little Hoot has reached his new home (see previous post) and I am happy to see that he coordinates with his new surroundings perfectly!


Thursday, 25 September 2014

I gave a hoot!

When someone does something super wonderful for you, do you give a hoot? (To "give a hoot" is an idiom which means "to care about") Well, I do, and in this particular case, to say "thank you", I decided that I would give a Hoot!

It started with some eyes. I cut out two large blue circles & two smaller black circles from felt; and sewed them together with yellow embroidery floss using a blanket stitch.


And a Hoot's not a Hoot if it doesn't have footsies & flappers, so I cut those out of yellow felt & I blanket stitched around the edges with blue embroidery floss.


After I had attached the eyes, beak, flappers & footsies to the Hoot's body, I then machine sewed all the bits together leaving a small opening to stuff it.


This is my stuffing of choice - "Hobby Fill" from Spotlight. 


Please excuse the X-rated shot, but a Hoot's gotta get stuffed, and this was where his stuffing hole was...


And when my Hoot was stuffed I then sewed close his stuffing hole (the Hoot was gently anaesthetized first).

So there we have it, my finished Hoot:


Why don't you show someone special that you give a hoot by giving them a Hoot too!

This little Hoot is on his way to his new home. And no, I'm not going to spoil the surprise by telling you where he's going. Not yet anyway...


Would you like to make your own Hoot? 

Saturday, 6 September 2014

Tutorial - String Circles Block

Kerry's String Circles block

The following tutorial has been written to assist my fellow Quilty Sisters in making their String Circles bee blocks.  This is an alternate option & is easier than what is in the book & you won't need to buy any fancy equipment.  All you need is 3 photocopies of the template page and a 90/14 sewing machine needle.

I have purposely NOT included measurements or the templates for this block as it is subject to copyright.  If you would like the pattern for this block, please purchase the book: "Modern Bee - 13 Quilts To Make With Friends" by Lindsay Conner.  It is an excellent book and the profits will go to those who are due them.

 
Yes it looks scary, but I urge to you to give it a try and I think you will amaze yourself!  Prior to making this block I had never sewn a circle before.  I do paper piece but not the method shown in this book.  I am self taught with one of Carol Doak's books & tutorials.  It seems to make more sense in my brain than other methods I have seen.  If you are more comfortable using a different method of paper piecing by all means go for it.  There are no quilt police!
 
These photos were originally posted on Instagram with the hash tag #KerrysCirclesOfDoom - I have reposted them here to make life easier.
 
 
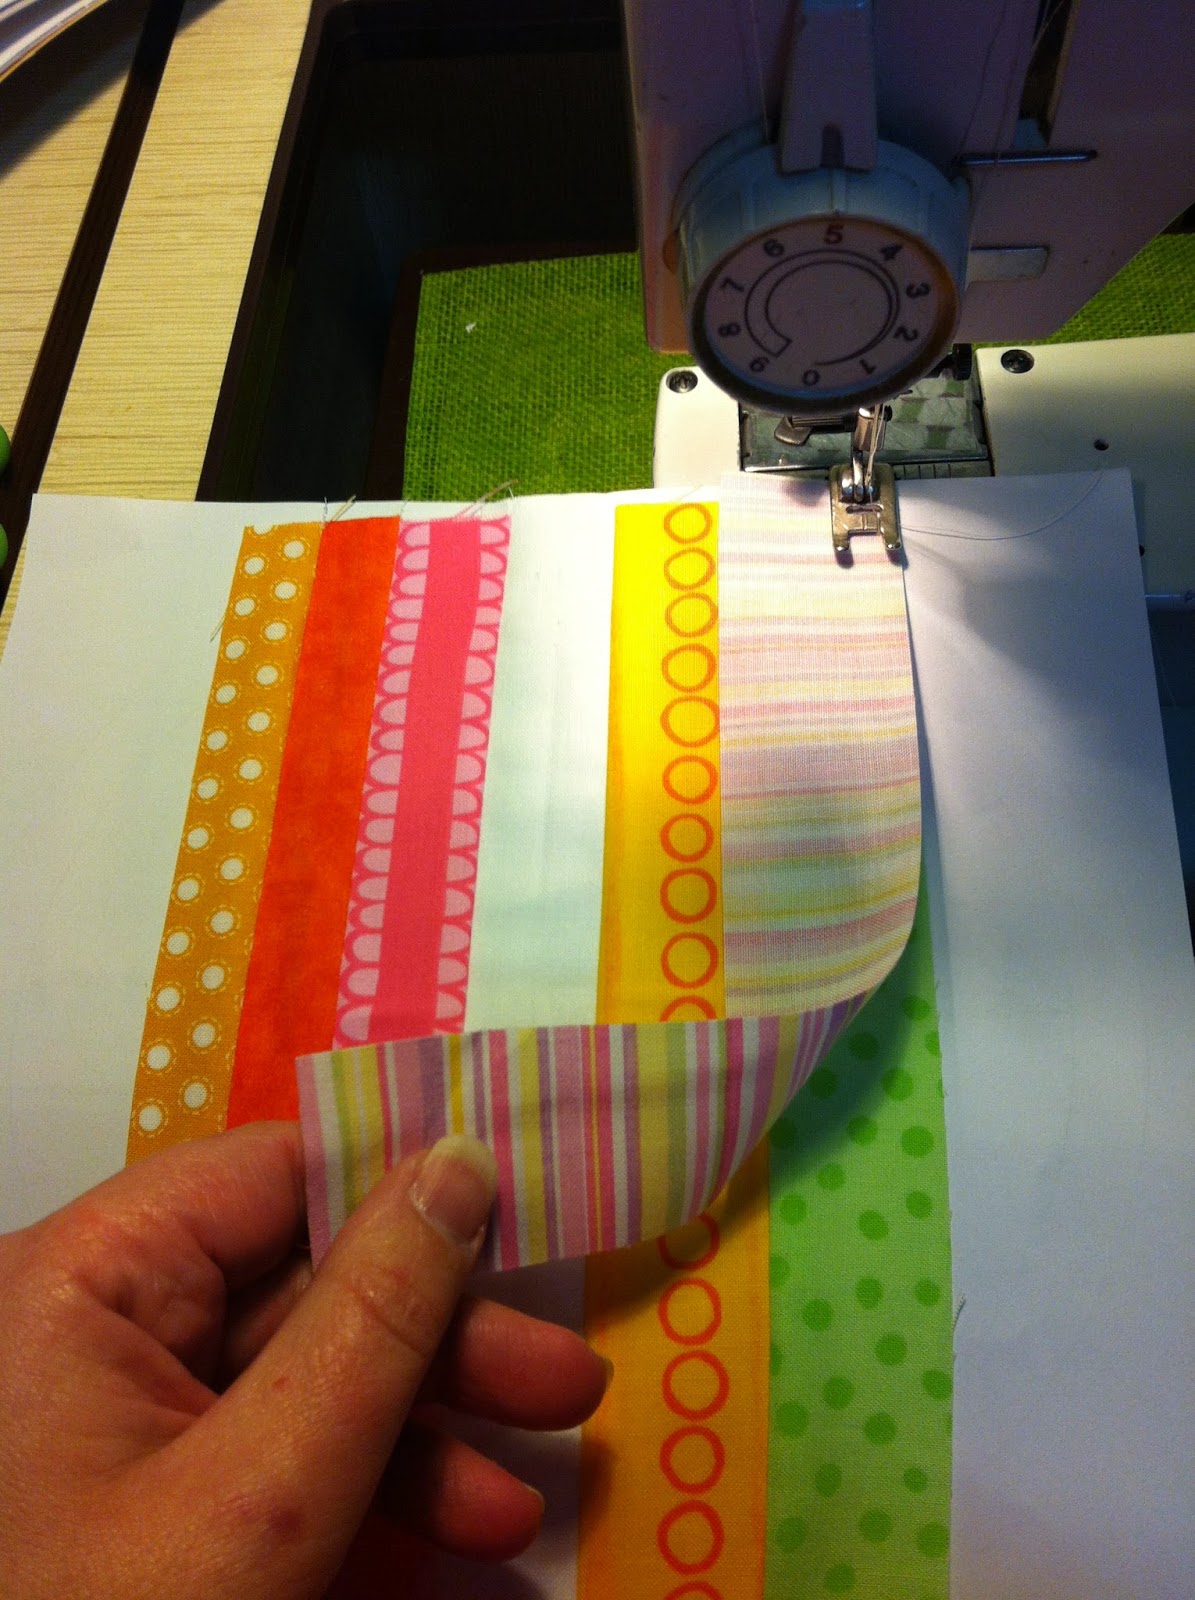
Setting Up: I have photocopied the template from the book and sticky taped it together using magic tape to form a circle.  Use a size 90/14 needle in your sewing machine & set your stitch length to 1.5 - this will make it easy to remove the paper at the end without ripping apart your stitches.  Normally I would use an open toe foot for paper piecing however this is so simple that your regular 1/4" foot should work fine.  By the way I have the photocopy paper around the wrong way in this photo - you want to join the strips to THE BACK of the paper and not the front. See next photo...

Block Assembly: Forget the glue stick the book talks about.  Instead lightly finger press the white strip down the centre & align the fold mark with the centre of the white circle.  Pin it in place.  Place coloured strip FACE DOWN & join as per instructions in book.  IMPORTANT: The printed side of the paper is face down with the fabric strips being sewn on to the back of the paper.  Also make sure that your strips of fabric are long enough & wide enough to cover over the outer circle on the template once they are sewn together, otherwise you will need to redo this with wider/longer strips.

This is the easy bit - lay fabrics face down upon the previous piece, aligning the right hand sides.  Sew them together on top of the paper using 1/4" seam.  Fold over each piece after it is sewn and press the seam straight & flat before joining the next piece.  {Worse case scenario, if you cannot manage this, just sew your strips together & use the circle as a pattern to cut them out.  Personally I found the paper helped to stabilise the circle as I sewed it but I have since sewn another circle without the paper & found it ok}.  It doesn't really matter which method you use as long as your seams are straight & the end result looks fab!

Cut out the pieced bit along the outer circle of the template.


I don't have one of those fancy cutting circle thingies that is shown in the book & I wasn't going to rush out to buy one so I just folded the white backing fabric into quarters; folded the template in half & pinned it to the fabric making sure that my folds & edges were properly aligned.


Cut out white circle from the background fabric along the smaller circle line. This photo depicts the three pieces that you should now have.  You will not be using the inner white circle. 


Joining the two sections: Now you are ready to pin the white background to the coloured circle.  You will need LOTS of pins.  The easiest way to explain how to pin is by imagining the coloured circle is a clock face.  Place pins opposite each other as follows: pin 12 o'clock then 6 o'clock; pin 3 o'clock then 9 o'clock; pin 1 o'clock then 7 o'clock; pin 4 o'clock then 10 o'clock; pin 2 o'clock then 8 o'clock; pin 5 o'clock then 11 o'clock; and then fill in any gaps with more pins. 


Very very carefully sew 1/4" around the 2 layers of fabric, removing the pins as you go & smoothing out the fabric.  Make sure the two layers of fabric are even as you sew. As the paper is still attached to the bright circle, you are still using a 90/14 needle & a 1.5 stitch length.  Anything different could make removing the paper difficult and you could rip out your stitches when you remove the paper


Here's a tip - I often use my unpicker to hold the fabric flat in front of the needle as I sew. It's better than sewing over your finger & you can get in nice & close.  Using one hand to hold the fabric at the back will give you more control.  And sew SLOWLY!!  Snail pace.  It is not a race and will help you smooth out the fabric as you sew.  You may have doubts & think that you will have excess fabric left over but you won't.  It is just an optical illusion.  As long as you have cut the two pieces on the correct template and pin well & smooth out your fabric it will match up beautifully!!!  Oh & don't forget to breathe! ;0)


This is how it SHOULD look after you have sewed the inner circle to the background fabric.  Now you can remove the paper.  Gently tug it and rip it off.  As long as you used a small stitch length of 1.5 & a size 90/14 needle the paper should be easy to remove by hand.  If any paper is caught in the stitches just use tweezers to remove it.  You might wonder why I keep harping on about this stitch length & needle size.  The wider needle will punch a larger hole through the paper making it easier to tear.  The smaller stitches will create a stronger stitch that won't rip away when the paper is removed and it will also help to perforate the paper making it easier to remove.


This is how the top layer should look before it is ironed. Iron from the back and gently flatten out the join before flipping it over and ironing the front. 

And there we have one completed "citrus" circle of doom.  Mine has a few wrinkles around the join but Julie says that using starch will hide this. The brand she recommends is "Best Press" but it is not the cheapest on the market and is usually sold in quilt shops.  But she says that any starch will do.
 
Kerry also sent a link to a tutorial that she found on Pinterest and hoped that it would offer extra help for the circles: