Showing posts with label gnome angel. Show all posts

Thursday, 16 June 2016

The Great Aussie Name Tag Swap

I recently participated in the #GreatAussieNameTagSwap on Instagram which was hosted by Angie Wilson @GnomeAngel  

Participants were assigned partners and we were required to make a quilted name tag that needed to include the person's first name and their Instagram name.  The minimum size was 5" x 3" and it had to be quilted.  Making a lanyard was optional. It was a fast turnaround swap so we only had approximately 3-weeks to make our creation and to pop it in the post.

WHAT I SENT

Sadly the partner that I was assigned has failed to check in throughout this swap or to acknowledge that she has received what I sent her.  According to Australia Post she received it last Friday, so I can only assume that she did not appreciate my handmade gift.  Anyway, I thought that I did a good job and that I met her brief as best as I could.  I don't know her or her circumstances.  All that I knew about her (apart from her name) was that her favourite colours were blue, purple & teal; she likes Tula Pink fabric; and she likes squirrels & stars. No other information was provided. 

This is what I sent her together with some chocolate:

The Name Tag, Lanyard & Tula Pink Key Fob that I sent together with some chocolates.

A close up of the front of the Name Tag.
This was the back of the Name Tag

WHAT I RECEIVED

As we just had a long weekend, our mail delivery was delayed so I only received my parcel on Wednesday, but I am so completely and utterly blown away with what I received!!

Alison Goodall @quiltalicious was the person who made for me and she totally & utterly excelled.  She made me the most amazing name tag & lanyard which is so "me"!!  I absolutely LOVE IT!!!!!!!! 

I'm not sure if you can see the detail, but she has used some Tula Pink and Emma Jean Jansen fabrics in the lions mane, and the lanyard is made from "Terra Australis" by Emma Jean Jansen.  Her embroidery work is also perfect!  Seriously I am just totally blown away with the exquisiteness of her work! 
Here is a close up of the Name Tag & the Lanyard.  The lion pattern is foundation paper pieced and is a pattern by @QuietPlay

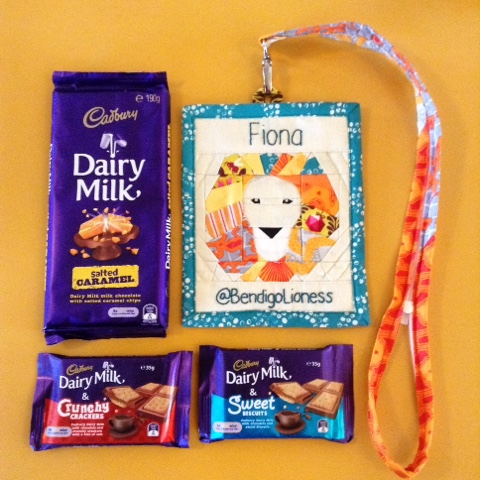
I also received some rather yummy chocolates
Isn't it utterly gorgeous!!!!  I'm going to Craft Alive on Friday & I am going to wear this with pride!  If you see me, please come & say hi.

Tuesday, 13 October 2015

The Farmer's Wife 1930's Sampler Quilt - Week 1


I suppose by now you've all heard about The Farmer's Wife 1930's Sew Along that Fat Quarter Shop and Angie (Gnome Angel) are hosting? Of course you have, everyone knows about it, it's all over social media ;0)  The sew along is based on the book "The Farmer's Wife 1930's Sampler Quilt - Inspiring letters from farm women of the Great Depression and 99 quilt blocks that honor them" by Laurie Aaron Hird.

Well yes, I have decided to sew along.  I have had intentions of making a paper pieced quilt made up of small quilt blocks for a while now but just hadn't had the time (I have been collecting patterns from another source but I will start this another time). When I saw this sew along start up I thought this will do, it's only 2 blocks per week over 12-months and no doubt with the masses of people sewing along I will be motivated to keep up. 

I ordered my book thankfully before the publishers ran out of copies, and it sat on my coffee table untouched for weeks until the sew along began late September - I still haven't had a chance to read it yet, but I have printed off my paper piecing templates from the CD Rom, yep - all 99 blocks:

The book and my 99 paper piecing templates
I had big intentions of making my version of the quilt using a combination of Bonnie & Camille fabrics, or the new Bloom & Bliss range by Riley Blake Designs, but the budget just wouldn't stretch that far.  Instead I decided to "Sew my Stash" and went rummaging though my fabric stash.  I have a large selection of black & white prints which I had been saving for another idea (which is still floating around in the vast abyss in my head), so I decided to go through them and to separate them into a "black" pile and a "white" pile.  I also had a fat quarter bundle of teal homespun solids which I had purchased from Spotlight.  And thus my theme was born - I am going to make MY VERSION of the "Farmer's Wife 1930's Sampler Quilt" a scrappy monochrome version with a pop of teal.

My Fat Quarter bundle of Teal Homespun Solids from Spotlight
my "blacks"
my "whites"
Week One kicked off on the 28th of September.  The first week we had 3-blocks to sew, and they were all rather quick and easy to piece together.  Although I am displaying my block photos like this, they will be set "on point" in the final quilt layout:

Block 16. Bonnie
Block 12. Becky
Block 8. Aunt

Monday, 9 February 2015

Hazel Hedgehog QAL

Hazel Hedgehog QAL on GnomeAngel.com
 
Welcome to the Hazel Hedgehog Quilt-a-Long Blog Hop...
 
The gorgeous Angie at Gnome Angel kicked off the Hazel Hedgehog Quilt-a-Long last week and asked if I would be her guest blogger for today.  How could I say no?  We all love Angie and we all love Hazel the Hedgehog!  Before we get going I wanted to extend a very special hello to all new visitors who are blog hopping today.  If you would like to follow my blog there is an email subscription option and a Bloglovin button on the right hand side.  I promise not to spam you!
 
Today I would like to show you a few tips on how to make the regular sized Hazel Hedgehog quilt block and the Hazel Hedgehog Glasses.  You will need to purchase a copy of the pattern from Elizabeth Hartman (see below for how to save 25% off the cost of your pattern/s).
 
Selecting Fabrics
 
Choosing fabric can sometimes be one of the hardest parts about making a quilt or quilt block.  Lately I have been experimenting with bright fabrics and I recently purchased some Kaffe Fassett prints.  I'm not a huge fan of all of his designs but some of them are just amazing, especially this particular colour combination.  One of my current favourites is called "Curly Baskets".  This fabric features beautiful large blue and purple swirls called Curly Baskets.  It also has touches of teal and mint swirled through it.   I decided to let this fabric be the hero of my Hazels and would use it for the hedgehog spines.  As I only had a fat quarter of this fabric I decided to make 3 hedgehogs (based on the first Hazel Hedgehog pattern release.  These quilt blocks will measure 8" x 9" or can be turned into 12" blocks by adding sashing - refer to page 5 of the pattern).
 
Curly Baskets by Phillip Jacobs for Kaffe Fassett for Westminster fabrics. 

I sorted through my collection of solids and found three coordinating sets of colours to match my print - Mint, Purple & Blue.  Don't forget that you will need a light fabric for the faces and a medium fabric for the bodies, so I grabbed two shades of each.  I also grabbed some black for the eyes & nose and for the background I chose to use some black Essex Linen.
 
My fabric pull.

Some Tips to Piecing Which Will Give You Better Accuracy
 
Making the Block: After you have cut all of your pieces, I strongly advise you to label all of your pieces.  When you move them from your cutting area to your machine, do remeasure to ensure that you label the correct pieces as many look similar to the naked eye.  This will save you from growing a few grey hairs and a lot of unpicking (yes I speak from experience)!

Make the Spines Unit - Step 5.  Does your Hazel have a wonky ear?  Use a pencil or a water erasable pen to mark a diagonal on the reverse side of piece E so that you have a straight line to sew on.   Can you see how wonky my sewing line was before I accurately marked it from corner to corner with a ruler.  It was only a few millimetres out but just a few millimetres here and there can make a huge difference to your finished hedgehog.

Now my Hazel has a lovely straight ear.
Finish the Block Step 1 - When sewing the Spines Unit to the top of the Head Unit.  Use pins to line up your seams.  Where the red arrows are I have poked pins from the top layer to the bottom layer where the seam allowance is to ensure that they line up.  You want the bottom of the ears to match up with the inner top corners of the C's (yep the rectangles above the eyes).  I have then secured the fabric by pinning it (see the three other pins).  The top pins marked with arrows were removed prior to sewing.
Here is another view of that same photo.  As you can see the top pins are just poked through the two layers to check for alignment.  Before I remove them for sewing I have secured the fabric by pinning it in place using flat quilters pins.
 
Finish the Block Step 2.  Sew the Side Units to the left and right sides to finish the block.  I have used a pin to align the top and bottom layers of fabric.  You need to make sure that the join of the top of the body (G) lines up with the lower left (or right) corner of the ear.  Once you have correctly aligned your fabric, pin it in place with flat quilters pins and remove the pin (marked with the red arrow). 

Making the Glasses

I've decided to add glasses to my minty green Hazel


I have used a product called "Therm O Web Heat N Bond Ultrahold"  It is an ultra strong paper backed iron-on adhesive designed specifically for all no-sew apparel, craft & home decorating projects.  Unlike other fusible web products, HeatnBond's solid layer of glue provides three times more bonding strength and requires less heat and shorter pressing time.  With HeatnBond Ultrahold, materials won't lift or pucker.  Edges don't need to be sealed. Materials can be machine washed. 
 
I just followed the manufacturer's instructions and the easy to follow instructions on Elizabeth Hartman's FREE download for the Hazel Hedgehog Glasses.  This was so much easier than I imagined!


And now my Hazel looks like a Librarian! ;0)


My completed top

How Did I finish off my Hazels?

I used a polyester batting and stitched around the ditch of my hazels to make them nice & puffy.  I ended up ordering some extra Kaffe Fassett fabric so that I could bind my quilt in the same fabric.  My finished quilt measured 12.5" x 31" which is an ideal size for a table runner or a long mini quilt.
Table Runner

Hazel and the Hedgehogs


Hazel and the Hedgehogs


Thank you for joining me today.  I hope that you will find these tips useful and that it will encourage more of you to try Hazel's glasses. 

 
Would you like to save 25% off the purchase of the Hazel Hedgehog patterns from Elizabeth Hartman? 
 
Would you like to save 20% off your next fabric purchase from Cotton Factory (Australia) or Gotham Quilts (USA)? 
 
Would you like to make your own Hazel the Hedgehog and win a prize? 
 
If so, please visit Angie's blog post at Gnome Angel (links below):


KEY DATES WITH BLOGGERS
Ø WED 04 FEB – Hazel Quilt-a-Long Begins @ GnomeAngel.com
Ø FRI 06 FEB – Interview with Elizabeth Hartman @ GnomeAngel.com
Ø MON 09 FEB – Fiona @ Bendigo Lioness
Ø WED 11 FEB – Anita @ Daydreams of Quilts
Ø FRI 13 FEB – Raylee @ Sunflower Quilting
Ø MON 16 FEB – Brandy @ M3 Quilts
Ø WED 18 FEB – Melissa @ Ms Midge
Ø FRI 20 FEB – Tara @ Simply Crafted
Ø MON 23 FEB – Cassie @ Cassandra Madge
Ø WED 25 FEB – Kate @ Stitched with Love
Ø FRI 27 FEB – Link UpGnomeAngel.com & Gotham Quilts
During the Hazel Hedgehog Quilt-a-Long, the hashtag that we are using for all social media is: #HazelQAL  Other hashtags are #hazelhedgehogquilt and #hazelhedgehog - however only "compulsory" hashtag is #HazelQAL