Showing posts with label kaffe fassett. Show all posts

Tuesday, 8 November 2016

Making Luna Lapin - Blog Hop

It was a huge honour when Nadine from SewAndSo invited me to join in on the "Making Luna Lapin Blog Hop".   Making Luna Lapin is a lovely book by the wonderful Sarah Peel. (Scroll down below to see a sneak peek of the book).  The book contains 20 different garments and accessories to make for Luna as well as the pattern to make Luna herself.  

I must admit, I wasn't sure how I would go with some of the patterns as I am "JUST a Quilter".  I have had some experience making toys but absolutely no experience making clothes (except for a pair of adult pyjama pants which my mother helped me with).  I am so grateful that we had a few months lead time for this project as I tackled it in stages.  In full disclosure, this ended up being a joint project between me & my mother Barbara - I'll explain as we go along...

How to Sew a Rabbit:

There are 5-pages of very detailed instructions in this chapter together with corresponding "how to" diagrams. Author - Sarah Peel uses Liberty of London fabrics for the ears and the pads of the feet - I opted to use Kaffe Fassett Collective fabrics instead.  The print I have used was "Millefiore Pink" from the Kaffe Fassett Collective Spring 2016.  I felt that this fabric added a lovely pastel pop against my bunny's soft grey fur.  I also gave my bunny blue eyes.

Did I have any issues?  Not really.  The instructions are pretty straight forward, any oopsie moments were purely my own brain farts and were easily rectified.  I had a slight issue lining up the ears once I had finished sewing the head together but it was easily rectified by stitching a little flower on bunny's forehead between the ears.  I wasn't sure which seams were to be machine stitched on the inside or hand stitched on the outside so 95% of my bunny was machine stitched on the inside and turned through.  In hindsite I have a feeling that this was not the author's intention. If you would like to see a photo of Luna's body, there is a nude rabbit photo on page 19 of the book, my rabbit was too shy to pose nude. 

Polka Dot Dress:

I decided to make Luna's "perfect for every occasion" polka dot dress.  Instead of using polka dot fabric I used "Paisley Jungle" by Kaffe Fassett for Rowan Fabrics - GP60 in grey.  

To be honest I found this pattern very confusing. I did not like the look of the pockets and could not manage to attach the collar.  I telephoned my mum (a retired dressmaker & now a miracle worker) and arranged a date to bring bunny & dress over to her place.  We attempted to unpick and resew "my" dress, but in the end I cut out the pattern a second time and delegated the making of the dress to mum.  

Mum made a few minor alterations to the pattern, they are:


  • Omitted the pockets.
  • Added ricrac braid to embellish the front of the dress and the cuffs.
  • Used bias binding at the neckline instead of the collar.  
  • Used a box pleat on the front of the dress instead of a tuck pleat.
  • Omitted the bias binding from the hemline and just turned up the hem and machine stitched it.

The French Knickers:

As my mum has an impressive stash of lace, she volunteered to make the French Knickers. I left the pattern with her and she said these were dead easy to make. We didn't add any embellishments to the knickers.

Wool Coat:

Once my brain cells had time to recover I decided to tackle the wool coat.  I used a lovely soft lilac coloured acrylic felt for the coat.  

There are 7-pages of detailed instructions and "how to" diagrams showing you step by step how to make the coat.  I managed to whip it together rather quickly on my sewing machine without any brain farts UNTIL I was almost at the end of the pattern and noticed that the collar & hem both needed bias binding and the coat's front required 6 buttonholes to be sewn on.  Erm HELLO, "JUST a Quilter" here!  I have never stitched a button hole in my life and I was not about to destroy this coat in the process of trying.  So I picked up the telephone, "Hi mum, can I come and see you tomorrow?  Also do you have any lilac ricrac?"  

Mum the miracle worker to the rescue.  She took one look at the collar and said that we didn't need the bias binding, instead she hand stitched the inner collar down with matching thread (Aurifil of course).  As the coat was made of felt she said we didn't need bias binding on the hem (felt doesn't frey).  Instead I machine sewed two rows of fine stitches around the hem for effect. Inside the inner flap of the coat I added two press studs, and on the outer flap I attached three buttons for looks. This was a much simpler way to finish off the coat without tackling the "dreaded button holes of doom". Queue scary music!

The Shoes:

Bunny needed shoes to wear with her coat and I decided to use a darker shade of purple acrylic felt.  I raided mum's buckle supply but she did not have any buckles that were small enough, so instead I used two plastic purple gemstone buttons to add a little bling. After all, what bunny doesn't like a bit of bling! The shoes were dead easy to make and I hand stitched them whilst watching TV one night. 

Although I followed the pattern to the T, these shoes are a tiny bit too big for my bunny.  I think this is because I machine stitched the legs & feet & turned them in instead of hand stitching the outer edges (see my comments above under "How to Sew a Rabbit"). 

The Scarf:

It is almost summer in Australia but as this bunny is about to head off to a cooler climate overseas, I decided to make her a scarf.  

I rummaged through my Kaffe Fassett fabrics and pulled out a selection of scraps. Instead of using the provided template, I cut 3.25" squares from my scraps and cut them in half to create the 64 required triangles.  The directions supplied were very straight forward and I found myself in my happy place as I stitched away on my Elna. Once the scarf was finished I added an edge stitch about 1/8" in from the edges.  

I love the scarf!  It looks fab, however I don't think it really needs to be that wide.  I tend to fold it in half when I tie it around Luna's neck, but she looks so adorable wearing it! 

My Completed Bunny:

All dressed up and waiting until the day she boards the plane and flies off to Bakersfield, California!  What's that?  Did my dear friend Darla just fall off her chair?  Yes sweetheart, this little bunny is all yours and she can't wait to meet you!!
Whilst at my Mum's house, Luna helped herself to Granddad's bar and sat reading stories to the other bunnies.  Hey Darla, there are wineries not far from where you live aren't there?

------------------------------------------------------------------------------------

Buy the Book:

Click on the picture below to take a peek inside the book:

 SewAndSo

------------------------------------------------------------------------------------

Making Luna Lapin Blog Hop Schedule:

There are some talented sew bloggers from across the globe who are taking part in this exciting blog hop. They will be reviewing Making Luna Lapin, making Luna or her brother and making clothes to dress them both. Here is a list of the fabulous bloggers who are participating:

Ø  Monday 31st October SewAndSo
Ø  Tuesday 1st November – Meet Sarah Peel
Ø  Wednesday 2nd November Sew of Course
Ø  Thursday 3rd November Melanie Sews and Other Stuff
Ø  Friday 4th November Poppy in Stitches

Ø  Monday 7th November Carina Crafts
Ø  Tuesday 8th November – BendigoLioness
Ø  Wednesday 9th November – Bit of Tea and Honey
Ø  Thursday 10th  November – Thimbeleanna


I hope you enjoyed reading my review of "Making Luna Lapin" by Sarah Peel.  

You can get involved by making your own clothes for Luna or making Luna herself by purchasing the book

Don’t forget to share your makes on Facebook, Twitter & Instagram using the hashtags:  #MakingLunaLapin & #SewandSo

Tuesday, 16 August 2016

52 Quilters - Week 27 - Fiona Forsyth - My Gallery of Quilts


Today I thought that I would share some of my quilts with you.  I only have a few larger sized quilts which are finished, so I have selected a sample to share with you.  I enjoy machine sewing; foundation paper piecing; hand sewing; needle turn applique; English Paper Piecing (EPP); and embroidery.  I am still not confident in Free Motion Quilting so most of my quilts have been hand quilted. A few I have had professionally quilted by Linda at Ladybug Quilting in Bendigo. 

Please click on the links to see more information about each.  Quilts appear in no particular date order...

Millefiori Mystery Quilt - pattern & fabrics by Sarah Fielke.  Machine sewn and appliqued by hand.  Hand quilted in Perle 8.  Photo taken in Maldon
The back of my Millefiori Mystery Quilt is a Drunkard Path Quilt using the same fabrics by Sarah Fielke.  Hand quilted in Perle 8.  Photo taken in Maldon.
The Daisy Quilt - pattern by Emma Jean Jansen.  Made from "The Linen Cupboard" fabric by Emma Jean Jansen for Ella Blue Fabrics.  Yet to be quilted.  Appliqued by hand.
Savanna Safari - made using Cotton & Steel fabrics.  Foundation Paper Pieced using patterns by Tartan Kiwi and Quilt Art Designs.  Photo taken in Kyneton.  Quilted by Linda at Ladybug Quilting.
The back of my Savanna Safari quilt features a leopard running through the grass.  Quilted by Linda at Ladybug Quilting.
Here's a close up photo of Mr Lion - a foundation paper pieced pattern by Tartan Kiwi.  Quilted by Linda at Ladybug Quilting.
The Circle Game Quilt - pattern  by Jen Kingwell.  Made from Kaffe Fassett fabrics.  Mostly hand sewn using a combination of techniques & hand quilted in Aurifil.
The Circle Game Quilt - photo taken in Echuca
Norma's Kaffetastic Kaffetivating Circle Game Quilt - a lap sized version of the Circle Game Quilt by Jen Kingwell made from Kaffe Fassett fabrics which I made for my friend Norma.  Hand quilted in Perle 8.  Photo taken in Port Melbourne
Four Squared Cats - pattern by Jodie Carleton.  Made using "The Cat's Pyjamas" fabric also by Jodie Carleton for Ella Blue Fabrics.  Yet to be quilted.
My completed Zesty Hexies quilt top (yet to be quilted).  Made up from way too many 1” hexies for me to count!
a close up of my Zesty Hexies top
a close up of  my Zesty Hexies quilt back 
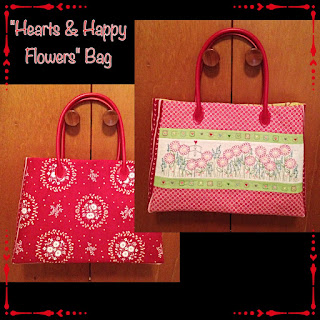
Although not a quilt, I couldn't resist sharing my one and only bag with you.  The pattern is "Hearts & Happy Flowers Bag" by Leanne's House.  The front panels are hand embroidered and it is made from various Lecien fabrics and the "Hearts & Happy Flowers" fabric range by Leanne Beasley for Ella Blue Fabrics.

Thursday, 30 June 2016

Fiona's 4000

Back in April I clocked up 4000 Followers over on Instagram so I decided to host a little giveaway.  As I had just completed my Circle Game Quilt, I decided to offer the winner a custom made mini quilt or cushion cover of their favourite Circle Game block.  

Here is a copy of my original post with the T&Cs: 

@BendigoLioness "Wow, my counter has just clicked over the magical 4,000 followers! I cannot thank you all enough for the support, encouragement, laughs, friendships & inspiration that you all give me. As promised, I have decided to offer a little giveaway to celebrate. 🍾 I know that a lot of you have shared my journey as I have made my "Circle Game Quilt" over the past 12-months. Many have commented on it, some have conspired to "steal" it 😜 & some have offered to buy it, but sorry, I won't be parting with this baby - it was my therapy after the death of my purr-baby Gemma and has helped me to cope with the anguish of her loss. However, as a way to say THANK YOU I would like to make one of you either a mini quilt or a cushion cover in the colour scheme of YOUR CHOICE, based on one of these blocks (I'll let you choose which one too). Yep, I will custom make it for you! 😃 


To enter: 

1) Regram this picture on Instagram with the hashtag #fionas4000 

2) On your regram tell me how I can colour your world - what is your preferred colour scheme? (Some examples: brights, mono, pink with purple polkadots, low volumes with a pop, whatever YOU want. Individual designers not guaranteed but I will do my best to accommodate your colour preferences). 

3) Please state your preference of "mini quilt" or "cushion cover" on your regram. 


🔸I will close this off on Saturday 09 April 2015 at 5:00pm AEST & after verifying entries will aim to announce the winner during #saturdaynightcraftalong . 

🔸Entries open to all Instagram friends & followers worldwide with a public account. 

🔸No private or giveaway accounts & human accounts only please 🙀 I will contact the winner directly to get further details from you before I start to make your prize.

🔸 For the record this giveaway is purely of my own and is no way endorsed by @jenkingwell . "The Circle Game" is a licensed pattern by Australian designer Jen Kingwell and I have bought the pattern for my personal use."

@nanaani83 - Anita Sharp was the winner
The winning entry was number #6 which was Anita Sharp from Fresno, California (USA). 

Anita is a fellow Kaffe Fassett fan and she requested a mini quilt made from bright jewel tones.  She chose block number 13 and after consulting with her on colours & fabric options, I set about making her prize.  

Anita's finished prize.

・・・
This thank you is a few days late, and I hope that the lovely Fiona @bendigolioness accepts my apologies.

I was the winner of her 4000 follower giveaway, and she created this incredible mini-quilt just for me! The colors are so vibrant and beautiful- absolutely stunning, and her handwork is impeccable!!!

Miss Fiona also included some Australian tea, an adorable spoon rest, and a variety of chocolates that I have had to protect from the maws of my greedy menfolk! 

Fiona - I absolutely love this package - Thanks from the bottom of my heart!!! 💗💜💙❤😻 


Saturday, 18 June 2016

The Circle Game Quilt

My completed Circle Game Quilt
Further to my post the other day, I realised that I hadn't provided any specs about my Circle Game Quilt.
The pattern booklet.  Available through all good quilt shops.
Pattern: "The Circle Game" by Jen Kingwell

Fabrics Used: 

  • I have used a mixture of fabrics by the Kaffe Fassett Collective which includes Kaffe Fassett, Brandon Mably and Philip Jacobs.
  • The black & white spot is "Spot On" design #14868 by Studio RK for Robert Kaufman
  • The grey is "Architextures" by Carolyn Friedlander for Robert Kaufman.  I think it was the "Shale" colour. 
  • The charcoal is "Quilter's Linen" screen rint D#9864 by Robert Kaufman
  • The Sashing - is a Kaffe Fassett print called "Freckles".  It looks yellow in some photos but it is actually a very pale lime green with flecks of red, pink, brown and green through it.
Techniques: Jen's quilts can be made using a variety of techniques and I am sure that everyone does theirs differently.  I estimate that at least 85% of this quilt was sewn by hand.  There were a few simple blocks which I machine pieced but mostly I hand sewed them.  I did machine piece the borders and the sashing.  It has taken me approximately 12-months to complete this quilt.  

Quilting: I have hand quilted this quilt using Aurifil threads in a combination of 40wt, 50wt and 28wt that I ordered through Ms Midge.

The individual blocks:

Block 1
Block 2
Block 3
Block 4
Block 5
Block 6
Block 7
Block 8
Block 9 - this is one of my favourites
Block 10
Block 11
Block 12
Block 13
Block 14
Block 15
Block 16 - another one of my favourites
The finished quilt top:
Here is the flimsy hanging up above my bed prior to being quilted.
Miss Amity's "schexy pose" - it's a shame I had the window open when I took this photo as the wind blew the right hand side, but Amity's pose is just too cute!
Basting & Quilting:
My mother helped me baste the quilt in the craft room at her retirement village.
About to pin baste
Ironing and basting
These are all the Aurifil threads that I used to hand quilt this quilt.
Hand quilting
Hand quilting
Hand quilting with Aurifil
Hand quilting with beautiful Aurifil threads
When I was too tired to hand quilt, Miss Amity took over for me ;0)